We’ve enjoyed our new trailer for a year, but there are a few upgrades we identified fairly quickly that we wanted to make, and upgrading the batteries was at the top of the list.
Our Airstream came with 2 80Ah AGM batteries. These were totally insufficient for our needs. Even with the 300W of rooftop solar installed on the trailer, our energy needs exceeded the capacity of the stock batteries. Our short term solution was to add an EcoFlow portable battery but we still knew we needed a permanent upgrade.
One major driver is that newer campers tend to come with refrigerators that only run on electricity. Previously, it was very common to have a refrigerator that could switch between electricity and propane. Propane is less convenient, less safe, and more complicated than electricity, but it does enable a cold fridge on extended outings without electricity.
The first step was to determine how much additional battery capacity we needed. The existing batteries provided 160Ah of power, which translates to 1.92kWh of power at 12V. However, AGM batteries cannot access the full capacity. You can read more about the voltage curves of AGM batteries, but the short version is that you can genereally only access about half of the capacity, so that 1.92kWh is functionally 0.960 kWh (960 Wh).
We also had experience with the EcoFlo portable battery. It provided 2kWh, although with some efficiency loss through a DC->AC conversion, and then AC back to DC within the trailer. But we felt this was a good amount of power for us, especially since we planned on keeping the EcoFlo battery around as a backup.
The next consideration was where to install the battery. The first option was to simply reuse the existing battery compartment, which previously held the 2 AGM batteries. On our 2023 International 27FB the battery box measures 15"W x 13"L x 10 3/4"D. The next option would be to move the batteries into the trailer. A popular option on this trailer is to mount the batteries in the front compartment. This has the advantages of allowing for bigger batteries and keeping the batteries warm while camping in colder conditions. It also moves the weight a little farther back which slightly reduces the tongue weight. However, it requires you to re-wire all the battery connections, and reduces the already limited space in the front compartment.
Finally, we needed to select a battery. The Battle Born batteries are very popular in the Airstream community and provide an impressive warranty and selection. They are also very expensive. They generally cost 2x as much as more budget friendly options. With the technology and cost of batteries changing quite rapidly, we felt it was better to start with a cheaper option. Even if it only lasted half as long as a Battle Born, the replacement in a few years would be cheaper and better.
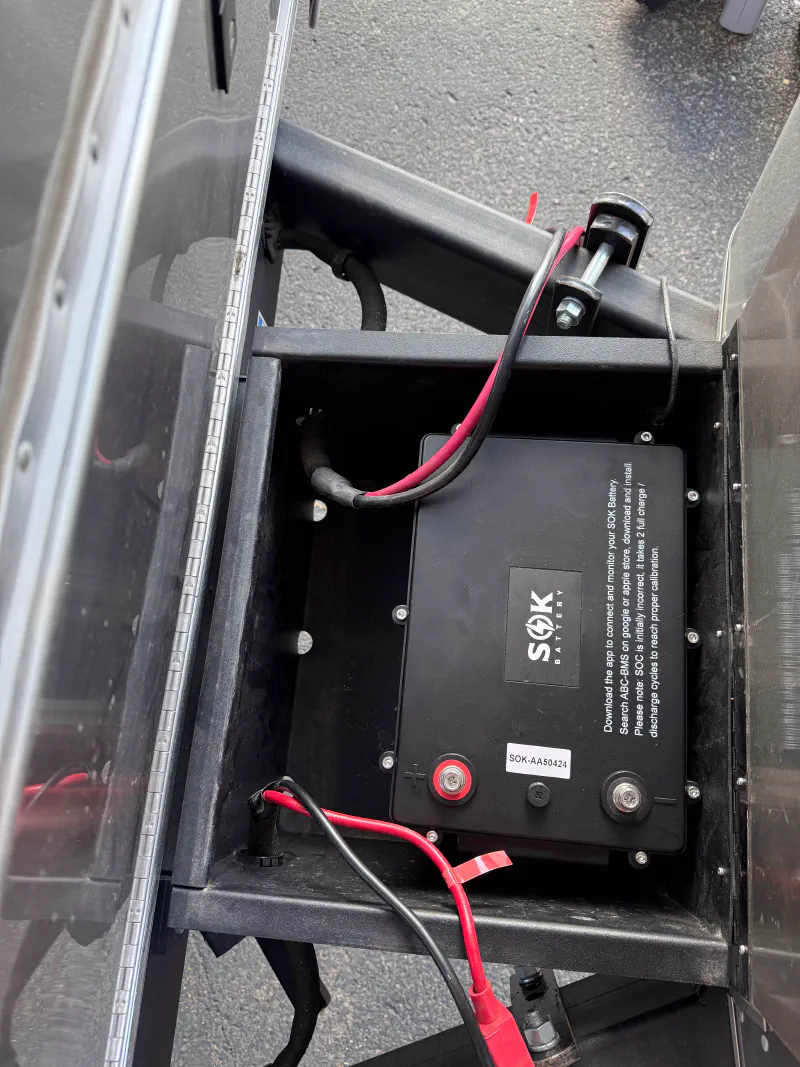
I did not want to sacrifice space in our front compartment, nor did I want to do any more wiring that was necessary. Luckily, I found the SoK 206Ah battery which fits into the existing battery box with room to spare. While its list price is $1,030.00 it can regularly be found for around $600.
One key feature in a battery is Bluetooth connectivity. While you can monitor the voltage using the display in the camper, the Bluetooth connection (with the SoK Battery App) allows you to view detailed information about the capacity, voltage, current flow, as well as enable the built in heater for charging in cold conditions. While not fancy, the SoK app provides all the data and control you need.
One important note about the SoK batteries is that they ‘go to sleep’ after an extended period without use. In order to wake it up you need to put voltage to its terminals. If you install it and plug it into your tow vehicle it should be good to go, but if you are trying to connect to it via Bluetooth out of the box, you may need to find a way to wake it up first. SoK has a helpful guide on their website. I just connected mine to an old battery charger I had on the lowest setting and it was good to go.
Since there was some room left over, I wanted to add a few improvements during the install as well. First, I wanted to add a battery cutoff switch. This allows you to easily disconnect the battery from the trailer without removing the terminals (or cut power before you unscrew the terminal connections). Second, I wanted to make it easier to install or remove the battery without wrangling many different leads. Finally, while the new SoK battery fits in the space, there is limited room between it and the roof, so reducing the amount of cables plugged in directly to the battery terminals was important.
The solution was to add 2 bus bars to the battery box. Since this is a key (high amperage) component in the system, I chose to go with a reputable brand. I chose the Victron 250A 6P Bus Bar. They go for around $60 on Amazon. You will need 2, one for the positive connections and one for the negative.
For the cutoff switch, I chose to stick with Victron and their Victron 275A Battery Switch. This goes for about $35 on Amazon.
I needed a few additional parts and tools.
- 4 AWG Cable (to connect the battery to the bus bar)
- Cable Crimper and Lugs
- Drill and Drill Bits
- Machine Screws and Lock Nuts
The cable lugs are specific both to the wire size (ex 4 AWG) and the post size. All the posts on the bus bars are the same, but the cables you need to wire into it vary in size. The SoK battery also has different size terminal posts for the positive and negative connections, so you will want to buy a variety of cable lug sizes for the project.
The most challenging part of this whole project was mounting the bus bars in the battery box. I chose to put the battery in the front of the box, and secured it with an existing strap I had to keep it from sliding around. I made 2 holes in the front of the box for the strap to go through and keep everything snug.
I also removed the existing solar charge connector. On our trailer, the connector was only rated to 100W which is not useful. Removing it freed up some space and was one less connection I needed to worry about.
I mounted the bus bars at the back of the box. There is not much space to work here so it is certainly a two person job to get the holes in the right place and secure the bus bars with screws and lock nuts.
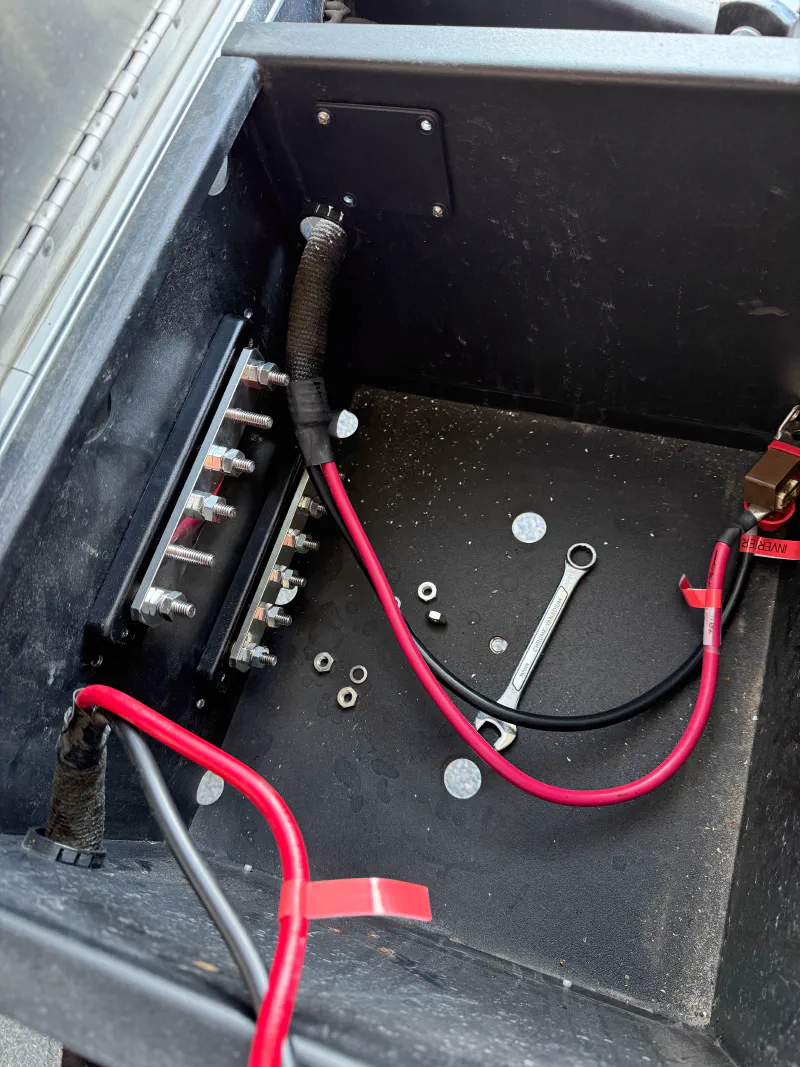
Once the bars were securely installed I attached all of the existing cables to the bus bar. I had to cut and add new cable lugs to fit the bus bar terminals. But this resulted in a much cleaner cable solution with everything securely attached.
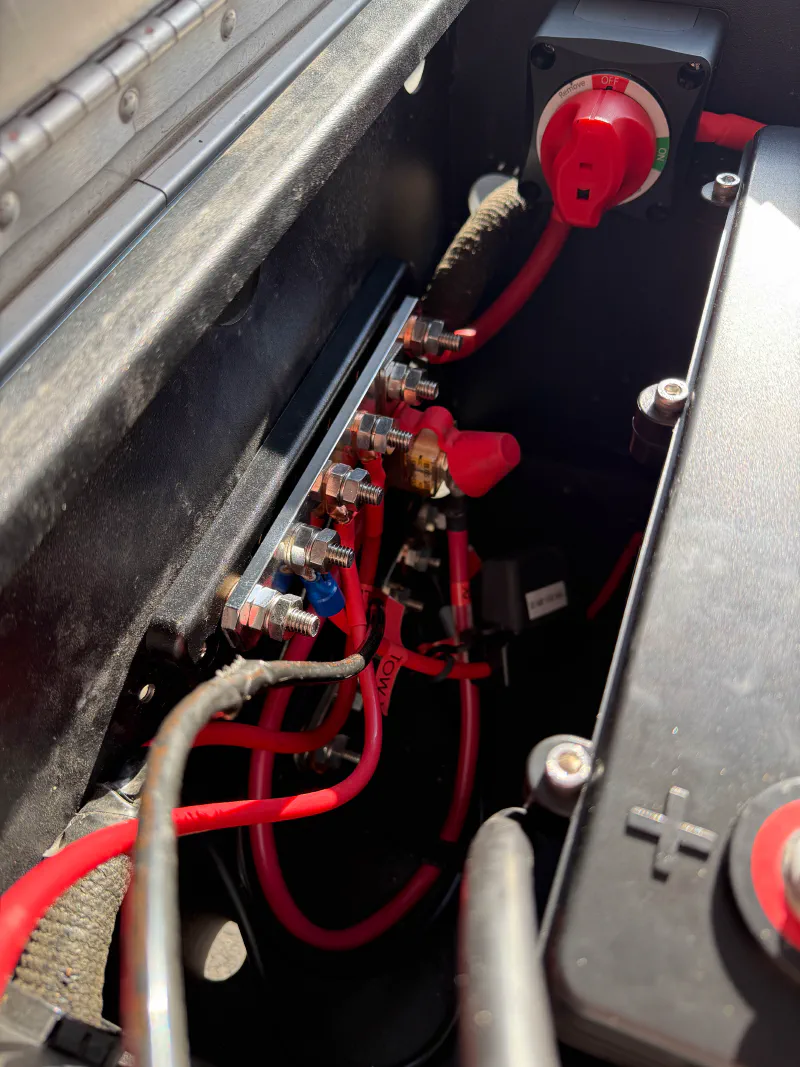
I added the cutoff switch to the side of the battery box next to the bus bars. Then I connected the cutoff switch to the bus bar, and to the positive terminal. The negative terminal is wired directly to the battery. For each individual cable, I left any existing fuses in place.
I can now easily disconnect the battery from the trailer’s power system and remove it for the season or extended periods in storage with only two easy to manage connections.